

Contents
From Basic Storage to a Personal Cloud: Building an Affordable Home NAS
For many years, despite owning a substantial library of digital media, my approach to managing it was incredibly simple—perhaps even too simple. My PC stored all my films, music, and years of precious photos on a separate drive. Organizing a movie night typically involved either dragging an HDMI cable to the TV or transferring files to an external hard drive. Eventually, I decided it was time to embrace the 21st century, a decision that plunged me headfirst into the rabbit hole known as NAS (Network Attached Storage).
The Average User’s Journey into NAS
Although I had occasionally heard of the concept of a “home server,” I was initially hesitant. My first thought was whether I truly needed such an advanced solution when my old methods had served me well for so long.
I assume many others share this sentiment. This article aims to be a practical and helpful account of an “average person’s” exploration into technology, which, in my case, ended with a successful, life-simplifying setup. The entire process also helped dispel a few common myths.
What do I mean by an “average user”? I possess some technological knowledge but am not an expert in all areas. I can assemble a custom PC from components and compare hardware specifications to choose the best options for my needs, or customize software for personal use.
However, I’ve never touched a soldering iron, repaired cables, performed minor electrical fixes, or brought a burnt-out radio back to life. I’m also no webmaster; I usually rely on step-by-step guides to solve my problems. I had no prior experience with Linux or Raspberry Pi.
This article follows that exact individual as they navigate the internet, a jungle filled with helpful people, but also trolls eager for arguments or to ridicule those with less experience. This is my story of finding “something for me.”
Dispelling Myths: “NAS is Not For Me”
The first step on my journey was to shed unnecessary baggage—specifically, the limiting thoughts and assumptions like, “Common sense tells me that…” While it sounds a bit philosophical, without this mental shift, the entire project would have remained in limbo for years, caught between “maybe someday” and “maybe not.” Here are the most significant misconceptions I held:
-
Overwhelming Information: Several times, I encountered the advice, “just set up a NAS” (without even knowing what Network-Attached Storage truly meant). However, discussions on forums could quickly make the idea seem daunting.
-
Technical Jargon: Many guides immediately dived into complex technical details, replete with acronyms and often unfriendly to newcomers. There was also an abundance of topics discussing hardware and software issues of already configured systems.
-
Initial Investment: Such a project would undoubtedly involve investing in a new device. A quick check at an electronics store revealed that the cheapest dedicated NAS unit cost almost 700 units of local currency—without any storage drives.
-
Running Costs: I wasn’t enthusiastic about a machine running 24/7. Who knew how much it would cost annually? Probably a lot. Was the initial investment and ongoing maintenance worth the potential convenience?
In summary, believing that a home server would be expensive, complicated to configure, a drain on my monthly budget, potentially problematic with errors, and not particularly convenient—it’s no surprise I hadn’t embarked on this project sooner. However, it turned out that the reality was almost the exact opposite.
Setting Up a NAS Server: Defining Requirements
Every solution, whether a phone, kitchen layout, computer, or car, serves specific purposes. For my needs, a relatively simple server capable of storing files accessible to multiple devices seemed ideal.

As mentioned, I have a lot of media that I sometimes want to watch on my computer, sometimes on the TV, and more recently, on a tablet I use occasionally before bed.
Initially, I didn’t need a vast array of options, such as adapting file quality to the receiving device, advanced remote file management, or 20 functions I wouldn’t even know how to use effectively.
By definition, this would also be a place where I wouldn’t keep my most critical documents or irreplaceable photos. I wanted to avoid a random failure turning into a major catastrophe. For truly critical data, adhering to the 3-2-1 backup rule is paramount.
Since this was my first “trial” server, the price was a crucial factor. There was no way I would spend close to 1000 units of local currency on a project that I might not ultimately like.
Approach One: Unleashing the Router’s Hidden Power?
Some time ago, I read an article about a lesser-known feature of routers. Most units come equipped with a USB-A port, which, in theory, can be used to connect an external USB drive, essentially transforming it into network storage.
This would grant my Wi-Fi network exactly what I was looking for: a single location where all my devices could access the same media library. And that’s where this article could have ended, were it not for one small problem…
My internet provider offered a specific router model. Locating the USB port on the back of the device took only a few seconds. Joyfully, I plugged in a test USB drive, expecting a new network folder to appear as if by magic.
However, nothing happened. This led to several hours of online searching, which yielded some interesting conclusions. It turns out a very similar router model is used by an internet provider in another country, but that version includes an additional device settings menu that my router simply lacked.
Finally, I found the manual for my exact model on my provider’s website. The documentation left no doubt: the USB port exists, but it’s unusable. Whether the port is physically disconnected or the provider intentionally disabled this feature via software remains unclear.
I even found people online who specifically buy a second router to gain full control over its features (including the option to connect a USB drive to the network). For me, however, this didn’t make much sense. If I was already starting a project requiring investment, why buy a second, almost identical piece of hardware that I already owned?
Approach Two: The Famous “Poverty NAS” and Thin Clients
I resumed my search, quickly stumbling into a corner of the internet saturated with keywords like “cheapest NAS,” “under X currency units,” and “DIY.” The term “Poverty NAS,” prevalent on forums and video platforms, particularly captivated me.
Starting with the first video under this banner, I was full of hope. The concept behind such servers is usually similar: they utilize what are known as thin clients. These are very small computers often purchased in bulk by companies or schools.
Thin clients are compact enough to be mounted directly behind monitors. They feature dedicated, energy-efficient components like processors, RAM, and storage drives. However, their capabilities are quite limited, usually only allowing for office work or simple applications.
I vaguely knew about thin clients, but I had never connected the dots to use them as a server. Such devices are often many times smaller than even compact PC cases and are typically more energy-efficient compared to a typical desktop computer.
However, I immediately encountered some difficulties. Many of these guides were several years old—some over three years. Much has changed since their creation, primarily due to the relentless forces of the free market.
Hardware that was available at ridiculously low prices a few years ago can now be completely unobtainable. The price of other components has increased so much that building a NAS no longer feels “poor-friendly.” Furthermore, the market is constantly evolving, so the optimal hardware in terms of price-to-performance might have shifted significantly since a particular guide was published.
For example, a guide I found recommended a specific thin client model. At the time, it could be bought for a mere 20 units of currency, but today it seems completely unavailable on popular auction sites. Another model required cutting and soldering custom wires to properly power a larger number of 2.5-inch drives.
Approach Three: My First Look at HP
While I learned a great deal from the initial guides, my NAS journey was far from over. I now knew I was looking for a thin client to serve as the foundation of the entire project. However, different models vary dramatically.
Some thin clients offer several SATA ports, while others only have M.2 connectors. The number of drive ports itself is incredibly crucial. This can mean the difference between a modest server with a single drive and a “beast” containing, for example, four different drives, offering significantly more storage space at a lower cost.
Since I couldn’t blindly follow a specific guide, the next best thing was to research thin client models that I could realistically purchase in today’s market at a reasonable price. Websites that compile statistics and advice on various thin clients proved invaluable.
A key resource for this entire endeavor was a popular online channel dedicated to tech reviews and comparisons. This creator methodically and concisely compared available terminals (and those less available now). Each piece of hardware was shown internally, with quick insights into the BIOS and immediate advice on potential uses. It was a true treasure trove of knowledge, helpful even for complete novices.
Below the videos, in the comments section, a community formed, asking additional questions and sharing their own insights and projects.
In my case, it was enough to watch a few videos and choose a model with good specifications and hardware that I could easily find for sale on online marketplaces.
My first target became the HP ThinClient T610. Despite being released way back in 2012, it was relatively available. Furthermore, it offered three connectors, allowing for the relatively straightforward connection of up to three internal drives.
Specifically, it had two SATA connectors and one PATA connector, which could also be used with an appropriate adapter. Used SATA drives are typically more affordable than those using M.2 connectors.
Because the HP T610 was released quite a while ago, it was also a platform tested by various individuals as a NAS over many years. I saw many comments from people who had chosen this model and had been using it flawlessly for four or five years.
The device was already in my cart when I decided to review all the pros and cons one last time. In a comment, I found a very pertinent point: at full processor load, its power consumption was 25 watts, and idle, it was around 14 watts.
The person who pointed this out added that another terminal offered idle power consumption of 5 watts—almost three times less than my chosen unit. In the same thread, the content creator also admitted that energy efficiency was the weakest point of the HP T610, despite its numerous advantages.
I remembered that this device would run 365 days a year, so over a few years, these differences could significantly add to my electricity bill. Could this be optimized?
The Final Approach: HP Triumphs
My attention shifted to the HP T630. This device was released in 2016, making it somewhat newer than its predecessor. However, it differed in several key aspects. The first was the absence of traditional SATA connectors.
It offered two M.2 SATA connectors, allowing for the connection of two drives without any custom modifications. One connector supported only short M.2 drives (size 2242), while the other accommodated sizes up to 2280.
Interestingly, the system could theoretically be expanded to up to four M.2 drives. It features an internal USB 3.0 port, which, with a USB to M.2 adapter, could house another drive in the center of the motherboard. Nearby, there’s also an M.2 A+E expansion slot. With another adapter, a small M.2 NVMe drive could be installed here.
Finally, power consumption. Under full load, the ThinClient T630 draws 22 watts, but at idle, it’s only 6 watts, which is significantly better compared to the T610. Seeing several good offers online, I decided this client would become my first NAS.
My Home NAS: The Cost Breakdown
Once the model was chosen, it was simply a matter of purchasing components online. So, let’s summarize the costs. Did I truly achieve a “Poverty NAS”?
The used HP T630 thin client itself cost me exactly 139 units of local currency. I found a version that included the original power supply, 4GB of RAM, and an 8GB M.2 SATA drive. I considered this a significant saving.
Buying these RAM modules separately would have been much more expensive, a situation largely due to the global memory market. The same memory formats fit laptops, so even the used market isn’t very consumer-friendly.
Aside from data storage, I would still need a separate drive to install the operating system. Non-original chargers might be cheaper, but HP thin clients have a special protection that would prevent the system from booting.
Returning to the data drive—this is where it gets a bit pricier. A used 512GB M.2 SATA SSD cost me 190 units of local currency. Yes, this single component cost more than the entire computer, with its included accessories, into which it would be placed.
If you’re considering a similar project, you might already have such a component in your “junk drawer.” I didn’t, as my M.2 drives were usually NVMe, not SATA.
I also assume it would have been cheaper if I had bought a couple of much smaller capacity drives. However, over time, I would likely run out of space and would still have to buy larger drives a year later. I consider 512GB a good starting point that I won’t immediately need to replace “because I wanted to save money at the start.”
The total cost of the project was 329 units of local currency, which slowly starts to move away from the “Poverty NAS” label.
An M.2 SATA to USB 3.0 adapter cost an additional 50 units of local currency. However, I’m not including it in the final project cost, which I’ll explain below.
Building a Home NAS: It’s Surprisingly Simple
As it turned out, theoretical research and hardware selection were the most challenging parts of the entire project. Once all the components arrived, it took only about 20 minutes to fully assemble everything.
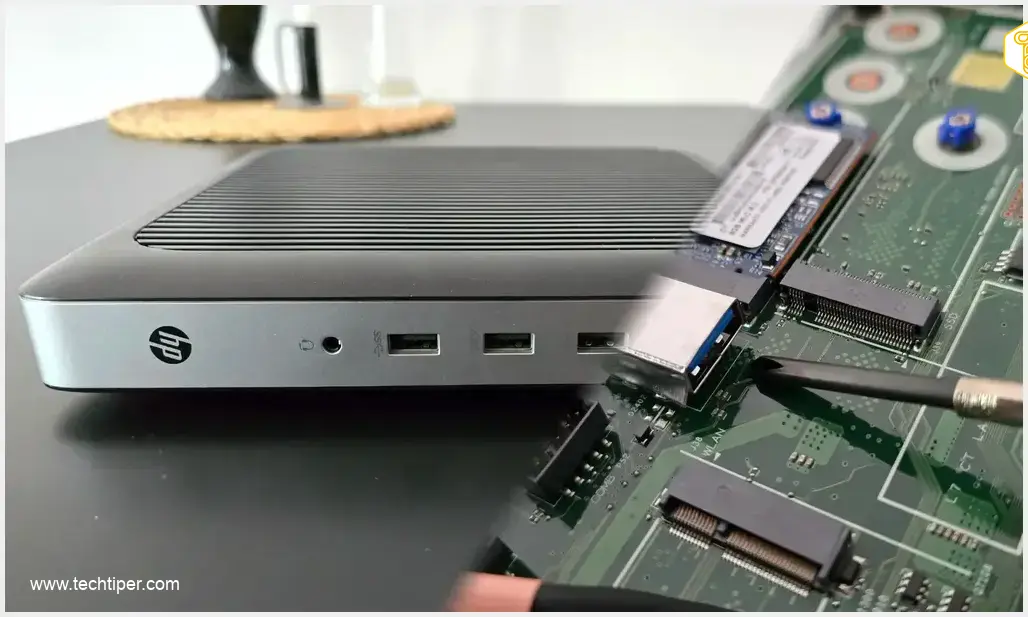
The client opens quite easily and without any tools. Simply pry a single latch on the rear panel, then slide the green slider from the closed to the open position. The rear panel can then be slid out and removed from the thin client’s frame. This is the configuration I saw immediately after opening the device:
It’s worth noting a few elements on the motherboard. We have the pre-installed RAM stick, but there’s also an empty slot for a second stick, should I decide to expand the system later.
Underneath the components, there are also thermal pads, which definitely help maintain a lower operating temperature. Remember, this system has no cooling fans and dissipates heat 100% passively.
In the upper left corner, there are dedicated slots for M.2 SATA drives. The seller had placed the tiny 8GB drive in the slot that accommodates various drive lengths. I would change this to avoid wasting the “best” slot on such a small drive.
Below, there’s also an internal USB 3.0 port and an M.2 A+E expansion slot. The latter is primarily for future system expansion, so I left it untouched.
I had the idea of putting the small M.2 SATA drive, intended for the server’s operating system, directly into the internal USB 3.0 slot. This would give me better access to the data drives and potentially faster read/write speeds for them. I was somewhat relying on intuition here, as I didn’t verify how the M.2 to USB adapter affects transfer speeds.
However, the adapter had screws that, for me, would be uncomfortably close to the bare metal on the motherboard, near the CPU socket. The solution? A bit of electrical tape for insulation.
The online community for the HP T630 proved quite active on 3D printing sites. So, I ordered some custom-designed feet from a friend with a 3D printer to keep my client stable in a vertical position.
I was also very interested in a custom bracket that allowed installing larger drives in the second slot, where the manufacturer hadn’t intended it. Not everything went according to plan, but more on that later. A bit of heat-resistant filament can significantly extend a small drive slot.
Building the First NAS: Software Setup
Software configuration wasn’t the most difficult part, though it wasn’t without a few hiccups. First, I checked the BIOS to ensure the recommended settings were configured correctly. It appeared the previous owner had already unlocked about 90% of what I needed. Apparently, this particular client model can sometimes surprise users with a BIOS in an unfamiliar language; luckily, mine was in English.
I confirmed that the system could operate in Legacy mode, disabled Fast Boot (which can reportedly complicate system installation), and decided that the system should automatically restart after a power loss (to ensure it’s always available, as a server should be).
However, I didn’t notice at the time that the number of recognized drives didn’t match my expectations. In the Boot Order section, only the 512GB drive appeared.
OpenMediaVault: User-Friendly Server Software
Next, we move to installing OpenMediaVault (OMV), which has a strong reputation online as a simple, ready-to-use tool requiring minimal configuration and meeting the needs of most users. For this, I followed a step-by-step guide from another online video creator.
The process involves downloading the latest system image from the official OpenMediaVault website and creating a bootable USB drive using open-source software like Etcher or similar tools.
After a few minutes, I was ready to install OMV on the thin client. This meant confirming the default hostname and domain, setting an administrator password, and pointing the installer to the correct 8GB drive. And just like that, the entire system was installed on the drive connected via USB 3.0 in a flash.
However, I encountered a problem: the system simply wouldn’t boot. After frantic online searching, it turns out that the HP T630 client does not recognize the internal USB 3.0 as a bootable connector. External USB ports are perfectly fine, but the *internal* one? No. I completely don’t understand this decision, but I found confirmation of this fact on dedicated forums and HP community sites.
Interestingly, the OMV installer recognized the drive in the adapter without any problem and allowed me to install the system there. However, the client’s BIOS did not see this connector during startup and indicated… that I had no operating system. Time for a change of plans. The drive with the already installed system went into another slot (the one that only accepts short M.2 drives), and the M.2 to USB adapter… turned out to be completely unnecessary. That’s why I’m not including it in the budget, although it might be useful in the future for installing another data drive.
Thus, the 3D-printed component designed to extend the drive mount also became redundant, as I was forced to place the small operating system drive in the available slot.
So, in its final configuration, my NAS now stands behind the TV, proudly on its 3D-printed feet. Not only do they look quite neat, but they also lift the casing off the surface, allowing for better airflow from underneath.
Configuring NAS with OMV: Feeling Like an Admin
The final step was configuring OpenMediaVault within the system itself. The easiest way to do this is by using a web browser on another computer. We log in using the credentials created during system installation. I followed all steps precisely, guided by the video material I linked earlier.
Successively, we need to:
Create a file system (in the menu of the same name > Create button).
Create a shared folder (Shared Folders > Add button > enter your preferred name).
Create a user whose credentials you will use to log in from other devices (Users menu > Add button > enter login and password).
After all this, we return briefly to the shared folder and, in the Privileges tab, grant the newly created user read and write access to our media folder.
For convenience, it’s also worth “exposing” our shared folder to Windows devices. This is done in the SMB/CIFS menu. Next, click the Shares tab and then Add. In the Configuration tab and General Settings submenu, click the Enable toggle at the very top. It’s essential to confirm the changes with the button at the bottom.
In the address bar of Windows File Explorer, simply enter the IP address of our server (you can find it in the configuration, or the device will display it itself after booting if you connect a monitor to it). Then, log in with the user credentials we created a few minutes ago in OMV.
Finally, right-click on your NAS folder and select “Map network drive.” This will provide very convenient access to the server folders directly from your regular File Explorer.
Accessing Your Home NAS from Mobile and Tablet
The icing on the cake is connecting other mobile devices to the NAS. The configuration here is quite straightforward, similar to a Windows PC.
Personally, I’ve used popular file manager apps for years to browse files on my smartphone or tablet. These programs often have an option to connect to network drives. Simply go to the Location Manager menu, select the LAN / SMB option, then the “Can’t find anything?” option, enter the server’s data or IP address, and log in as a user by providing the appropriate credentials.
Other applications, such as media players, also independently offer NAS connectivity and a very similar configuration process. After setting up the NAS, you might also be interested in optimizing your PC for performance and privacy to complete your digital efficiency overhaul.
Summary: My NAS Journey and Beyond
Through this project, the somewhat elusive idea of owning a home server transformed into a considerable undertaking. Over a few weeks, I learned a great deal about a corner of technology I had never delved into before. I compared hardware and its capabilities on paper, matched them to my needs, and solved relatively simple, yet thought-provoking, hardware and software problems.
The process itself was a fascinating DIY project, which made the final setup feel “more mine.” I am much more satisfied with it than if I had simply bought an off-the-shelf solution in a shiny box.
I honestly admit that 329 units of local currency is at the edge of my affordability. In my case, it doesn’t break my monthly budget, but different people may have different expectations and needs.
Everything depends on the drive deals you can find online and the minimum capacity that will suffice for you. I definitely opted for a solid foundation here, which I can expand over time by adding components incrementally.
Ultimately, I ended up with a piece of equipment that genuinely simplifies my life and was a change I didn’t realize I needed. The convenience of having a home NAS is immense, and this new gadget has brought me back to things I know I enjoy. For a long time, these were frozen on a forgotten drive that I rarely accessed. The home NAS makes my entire library visible, and the next movie night will feel like opening a giant bag of treats.
Frequently Asked Questions (FAQ)
A “Poverty NAS” refers to a budget-friendly Network Attached Storage system typically built using repurposed or low-cost hardware, such as thin clients. It’s appealing because it offers the functionality of a dedicated NAS at a significantly reduced cost, making network storage accessible without a large investment.
Despite the USB 3.0 port being physically present and recognized by the OS installer, the HP T630’s BIOS has a specific limitation that prevents it from booting an operating system from this particular internal port. This is a common, albeit frustrating, hardware-specific quirk found in some thin client models.
Building a DIY NAS offers several advantages, including significant cost savings, greater flexibility in hardware choice (allowing for better price-to-performance ratios), and a deeper understanding of the system, which aids in troubleshooting and customization. It also provides a satisfying learning experience compared to off-the-shelf solutions.
Power consumption is crucial for a 24/7 home NAS. Even small differences in idle wattage (e.g., 6W vs. 14W) can accumulate into significant electricity costs over a year. Opting for energy-efficient components, especially thin clients designed for low power usage, can lead to substantial long-term savings on your energy bill.
Source: Krzysztof Sobiepan
Opening photo: Krzysztof Sobiepan
About Post Author
