

Contents
Declutter Your Google Photos: A Three-Step Guide to Reclaiming Smartphone Storage
A cluttered photo gallery on your smartphone is a common frustration, often leading to a rapid depletion of storage space. Over time, countless images, screenshots, and duplicates can accumulate, making it difficult to find the photos you truly cherish. Fortunately, the Google Photos app provides powerful and intelligent tools to efficiently sort through your images, remove unnecessary files, and bring order to your digital memories.
1. Declutter in Manageable Timeframes
Attempting to organize years of accumulated photos all at once can be an overwhelming task and often leads to quick discouragement. A much more effective and sustainable strategy is to break down the task into short, regular sessions, focusing on a specific period, such as the past month, a particular season, or a recent trip.
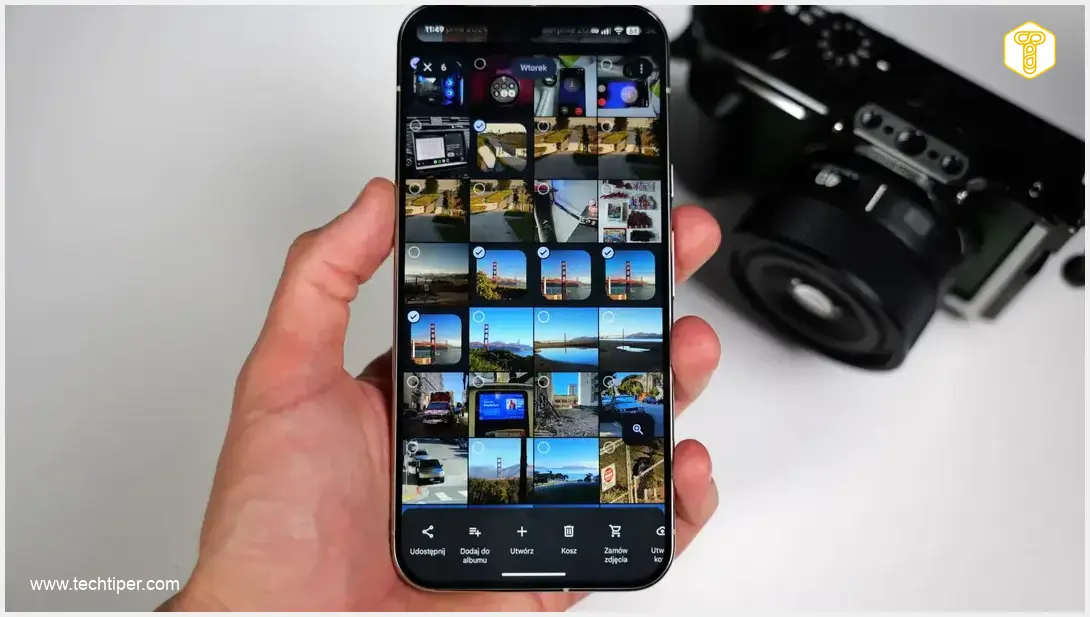
Google Photos simplifies this process by intelligently grouping your pictures:
- At the top of the Google Photos interface, you’ll often see “time windows” or event-based groupings, such as “Last Month,” “Summer 2023,” or specific dates.
- Sometimes, the app even highlights the location where a group of photos was taken, making it easy to review images from a particular event or place.
- A single tap on one of these time or location groupings will select all photos taken within that specific timeframe or at that particular place.
- Once selected, you have several convenient options: you can easily transfer these photos to an archive (if you want to keep them but not see them in your main feed), add them to a dedicated album for better organization, or bulk delete them from your device, which is an excellent way to free up significant space.
2. Safeguard Your Favorite Memories
While bulk cleaning your photo gallery is efficient, it can come with the inherent risk of accidentally deleting precious or significant shots. To prevent this common oversight, it’s an excellent practice to mark your most important or favorite photos immediately after taking them.
Here’s how to ensure your cherished images are protected:
- When viewing a photo you particularly like, simply tap the star icon, which is usually located in the top right corner of the screen. This action marks the photo as a “favorite.”
- Marking photos as favorites ensures they stand out and are easily identifiable, even when browsing through smaller grid views of your gallery.
- All your “starred” or liked images are conveniently accessible from the dedicated “Favorites” section within your Google Photos library. This provides quick and easy access to your most cherished moments without the fear of accidental deletion during large-scale cleanups. It acts as a curated collection of your best shots.
3. Google Photos’ Powerful Search Capabilities
Google Photos is more than just a storage app; it’s an intelligent organizer. It leverages advanced machine learning algorithms to automatically analyze the content of every single photo you upload. The search bar isn’t just for finding dates or names; it acts as an incredibly powerful filter and organizer, turning your vast collection into a searchable database.
You can simply type in a descriptive phrase such as “dog,” “beach,” “food,” “sunset,” or even specific items like “receipt,” and the system will instantly display all matching images. This intelligent search functionality is incredibly effective for:
- Rapidly locating specific groups of photos you might want to review, organize, or delete, such as old notes, screenshots, documents, or blurry shots of a particular object.
- Saving you from the tedious and time-consuming task of manually scrolling through your entire timeline, which can be daunting for large collections.
- The utilization of artificial intelligence, similar to the advanced capabilities seen in Google Search’s Live AI Conversation Visual Search and Google Gemini 3.1 Flash Live AI Conversation Visual Search, allows Google Photos to precisely pinpoint digital clutter and help you reclaim valuable disk space in mere seconds, transforming the way you manage your digital memories.
Frequently Asked Questions (FAQ)
Google Photos provides a dedicated tool to help you identify large files and blurry photos that might be taking up unnecessary space. To access this, navigate to “Library” > “Utilities” > “Manage storage” within the app. Here, you’ll find helpful categories such as “Large photos & videos,” “Blurry photos,” and sections for “Other apps,” which can help you prioritize what to review and delete to free up space.
When you delete photos from Google Photos, they are not immediately gone forever. Instead, they are first moved to the “Trash” or “Bin” folder, where they remain for 60 days before being permanently deleted from your account. This grace period allows you to recover any items you might have accidentally deleted. If you delete a photo from Google Photos that is also synced to your device, it may also be deleted from your device’s local storage.

Once photos are permanently deleted from Google Photos (either manually emptied from the Trash folder or automatically after the 60-day retention period), they cannot typically be recovered through the app. This is why it’s crucial to carefully review your photos and ensure you have backed up or saved important memories before initiating any permanent deletion processes. Always double-check your Trash folder before it’s too late.
Source: ZDNet, original work.
About Post Author
